GUIDE: MANAGING TAGS
Now that you've gotten all your safety data sheets uploaded how do you ensure that they can be quickly accessed? With possibly hundreds, or even thousands of SDSs in your inventory to sort through we've implemented a self managed tagging system that allows you quickly organize your SDSs into as many categories as you need. Click an option below to jump to a specific section on tagging.
CREATING NEW TAGS:
Step 1: The first step in managing your inventory is to create the tags you want to apply to your sheets. You can create as many tags as you want and you can set them up all at once, or one at a time as you need them. Once logged into your admin account you can create your first tag by entering the new tag name in the "Add New Tag" field, at the bottom left, and clicking on the blue button with the plus symbol.

Step 2: After clicking the blue button the Tag will be created and added to the existing list of tags alphabetically in the left column of the page.

Step 3: Next to each tag is a number in brackets. This number represents the number of SDSs with that tag applied to it. In the example above the newly created tag has "0" sheets tagged to it.
APPLYING TAGS TO AN SDS:
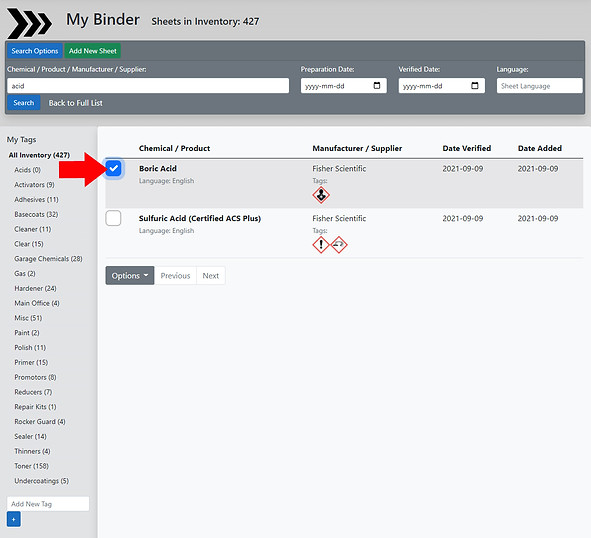
Step 1: Once you've created a tag you will need to apply it to your sheets. To do so, the sheet(s) you want to tag must be already populated into your inventory. If you're unsure on how to add sheets to your inventory see the "Adding an SDS" guide. Once you have the sheet in your inventory that you want to tag select it by clicking on the empty white box on the left. You can select multiple sheets at a time. In the example below the top sheet of Boric Acid has been selected but not the lower sheet of Sulfuric acid.

Step 2: Once you have all the sheets you want to tag selected click on the grey "Options" drop down button and select the "Tag Inventory" option. We've selected both of the acids now to apply the tag we created in Step 1 for both of them.

Step 3: Choosing the drop down option to "Tag Inventory" will bring up a list of all the tags you've created. You can apply as many tags as you'd like to the selected sheets. Just remember that if you select multiple tags, and multiple sheets, all the tags you choose will be applied to all the sheets you've selected. In this case we just only want to apply the tag "Acids" that we created in Step 1.

Step 4: Next you just need to check the box of the tag(s) you want to apply and click the "Save Tags" button at the bottom of the page.

Step 5: This will bring you back to the "My Binder" homepage for your SDSs and you'll now notice that the number of safety data sheets in your tagged folder will have increased by the number of sheets you've added. In this case two new sheets were tagged with the "Acids" tag which is reflected in change from "0" to "2" in the brackets beside the tag.

Note that any tags applied to a sheet will also be listed under the Manufacturer/Supplier name. We can see here that both acids have had the "Acids" tag applied in the main page.

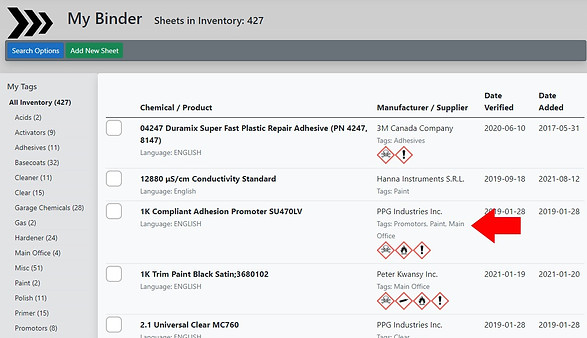
An SDS can have as many tags applied as you need, in order to organize your inventory. Notice that this sheet has 4 tags applied: "Promotors", "Paint", "Main" and "Office".

REMOVING TAGS FROM AN SDS:
If you make a mistake or decide to re-organize your tagging system you can remove tags in a similar fashion that you used to apply tags.
Step 1: Select the sheet you want to remove tags from by clicking the empty box to it's left.
If you are still experiencing difficulty adding SDSs to your account contact us for more assistance.

Step 2: Once you've selected the SDS you want to remove a tag from click the gray "Options" button at the bottom of the list and select "Remove Tags from Sheet".

Step 3: This will bring up your list of tags. Choose the tag you want to remove from your SDS by checking the empty box next to it and click the "Remove Tag(s)" button at the bottom of the Tags window.

Step 4: This will remove the selected tags from the SDS. Confirm the tag has been removed by checking the "Tag:" label of the SDS under the Manufacturer/Supplier" heading as well as the number of SDSs in brackets next to the tag. This number should have dropped by the number of SDSs you removed the tag from.

In the example above the tag "Acids" has been removed from the Boric Acid SDS (see Step 2 above) below the Manufacturer/Supplier. It has also been removed from the Acids tag in the left column. In Step 2 there were 2 sheets to the tag, now there is only 1.
If you are having difficulty with the tagging process or have further questions please feel free to contact us with your questions.
